Introduction
Experian Third-Party Onboarding is a service we offer third-party data providers to help them monetize their audiences. We use our existing programmatic and TV destination integrations to make data providers' syndicated audience taxonomies and custom audiences accessible to advertisers.
This document will take third-party data providers through details on how to use the taxonomy management tool. Taxonomy management is a self-service platform that gives you the ability to configure your syndicated taxonomy based on the selected endpoint destination. With taxonomy management, you can manage and make pricing edits, as well as metadata edits such as audience names and descriptions.
Quickly jump to a section using these links:
Experian points of contact
Main project point of contact: Experian Project Manager (PM). They will be your main point of contact.
Interest in other Experian products or services: Experian Account Executive or Relationship Manager. Please work with your sales team for data monetization contracting or if you are interested in using more Experian products or services.
Using Taxonomy Management
Getting Access to Taxonomy Management
- To onboard data through Experian, you will have to complete the business review steps and contracting steps with your Business Development contact.
- When you have been approved to onboard data through Experian, your account manager will work with you to ensure all needed information such as secured transport method access, billing details, etc. have been captured.
- The account manager will also notify the Taxonomy Management administrator of the new account that should set up for you and provide the email address that should be used for the account.
- The Taxonomy Management administrator will add your email address and grant you access to the platform.
- You will receive an email with a prompt to create a login for Taxonomy Management. To create a login, you will use the same email address given to the Taxonomy Management administrator and you will create a password.
- Once you have entered your email and the desired password, you will sign in and will have access to the platform.
Getting Files Into Taxonomy Management
Experian will do this on your behalf. To learn more, please ask your project manager about the data onboarding implementation guide for data onboarding.
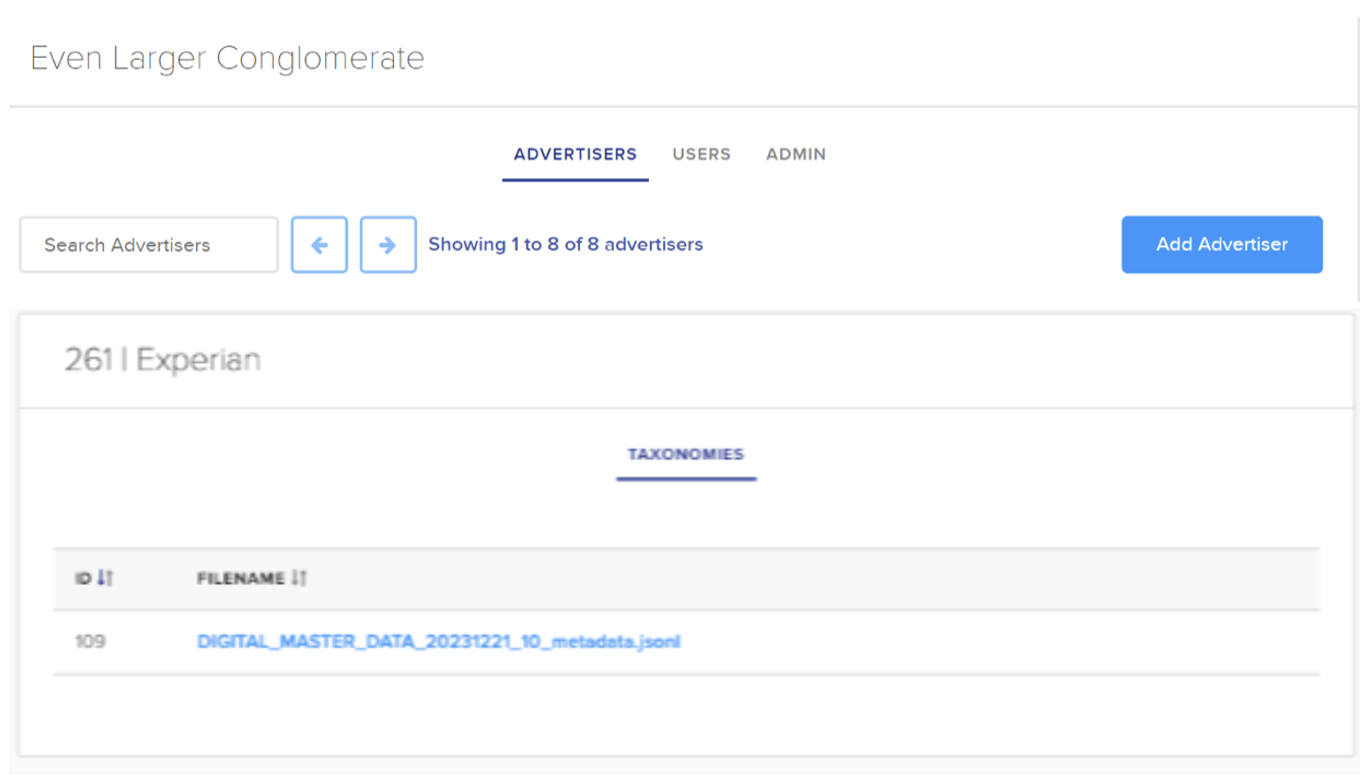
After signing into your Taxonomy Management account, you will land on the Advertisers section, which is specific to your account and any users you have granted access to.
During your account setup, the Taxonomy Management admin will also add your company name (or the brand name you’ve provided) as the advertiser.
Once your advertiser has been selected, you will land on the Taxonomies section, where you will see your ingested file that has been processed and delivered to Taxonomy Management.
In this section, you will click on the ingested taxonomy file to begin the reviewing and editing process.
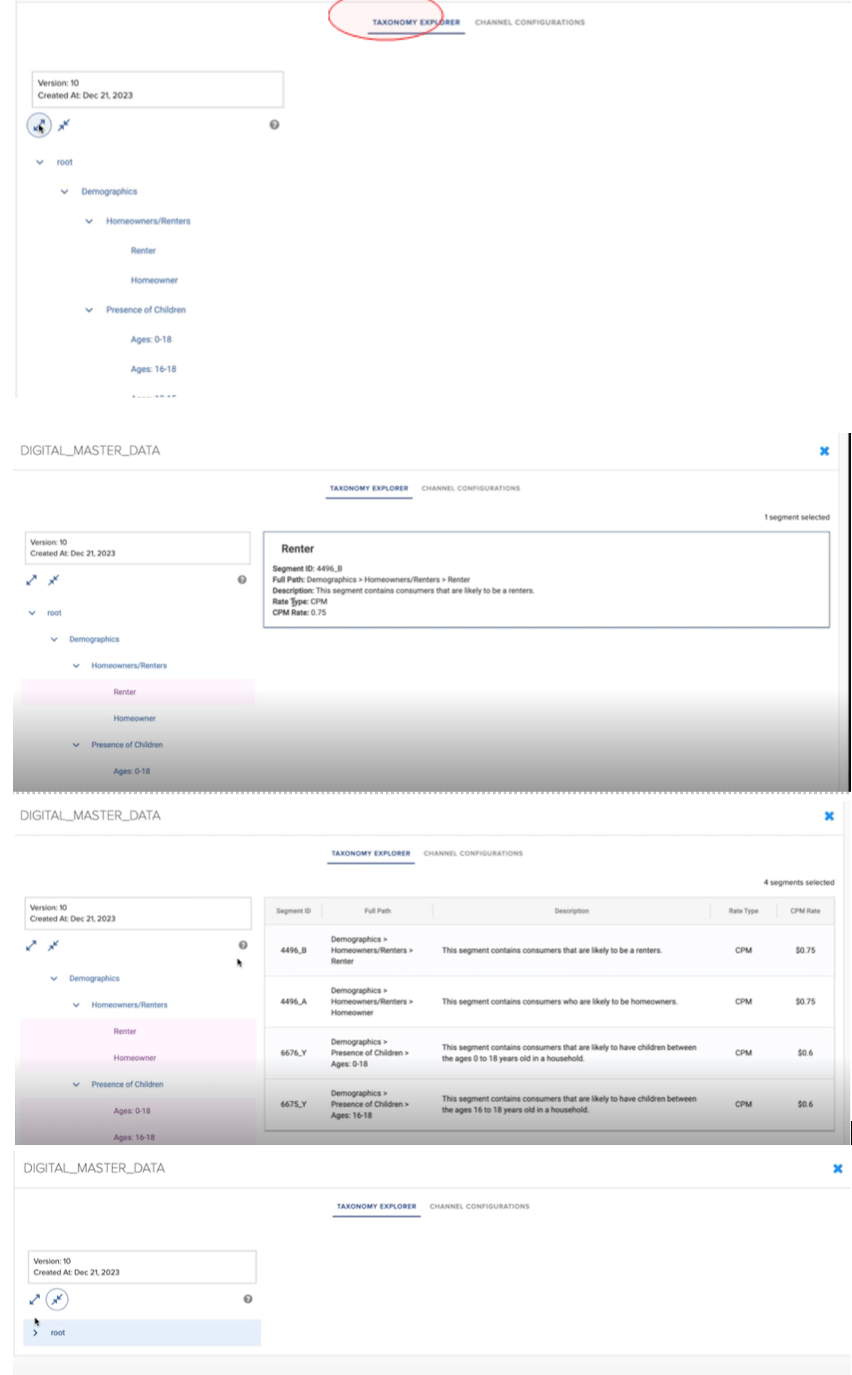
- Once you click on the uploaded taxonomy file in the Taxonomies section, you will land on the Taxonomy Explorer section.
- In this section, you can review the ingested taxonomy to confirm the file layout was processed as intended.
- To expand the taxonomy tree and see all the segments, click on the expand icon highlighted on the left side of the page below.
- By expanding the taxonomy tree, you can select any of the segments on the left side of the page to see the uploaded information.
- To review multiple segments at once, use the shortcut keys: “Shift + Click”.
- By using the shortcut keys “Shift + Click” to multi-select, you can now see the uploaded information for multiple segments in the taxonomy tree.
- After confirming the accuracy of your selected taxonomy, you can configure the taxonomy file for a supported endpoint destination.
- To do this, click on the Channel Configurations tab. This will show you the endpoint destinations you have sent your configured taxonomy file.
- To configure your taxonomy for a new endpoint destination, you will click on the ‘New’ icon on the right side of the page.
- Once the button has been clicked, a new channel configuration dropdown will appear on the screen.
- You will select the endpoint destination you want to send your data to.
Note: The Taxonomy Management team will enable your account to reflect the supported endpoint destinations once your account has been created.
- Once the new channel configuration has been created, a saved message will appear on the bottom right of the screen, the new taxonomy file will appear under the channel configuration section and will be ready for editing.
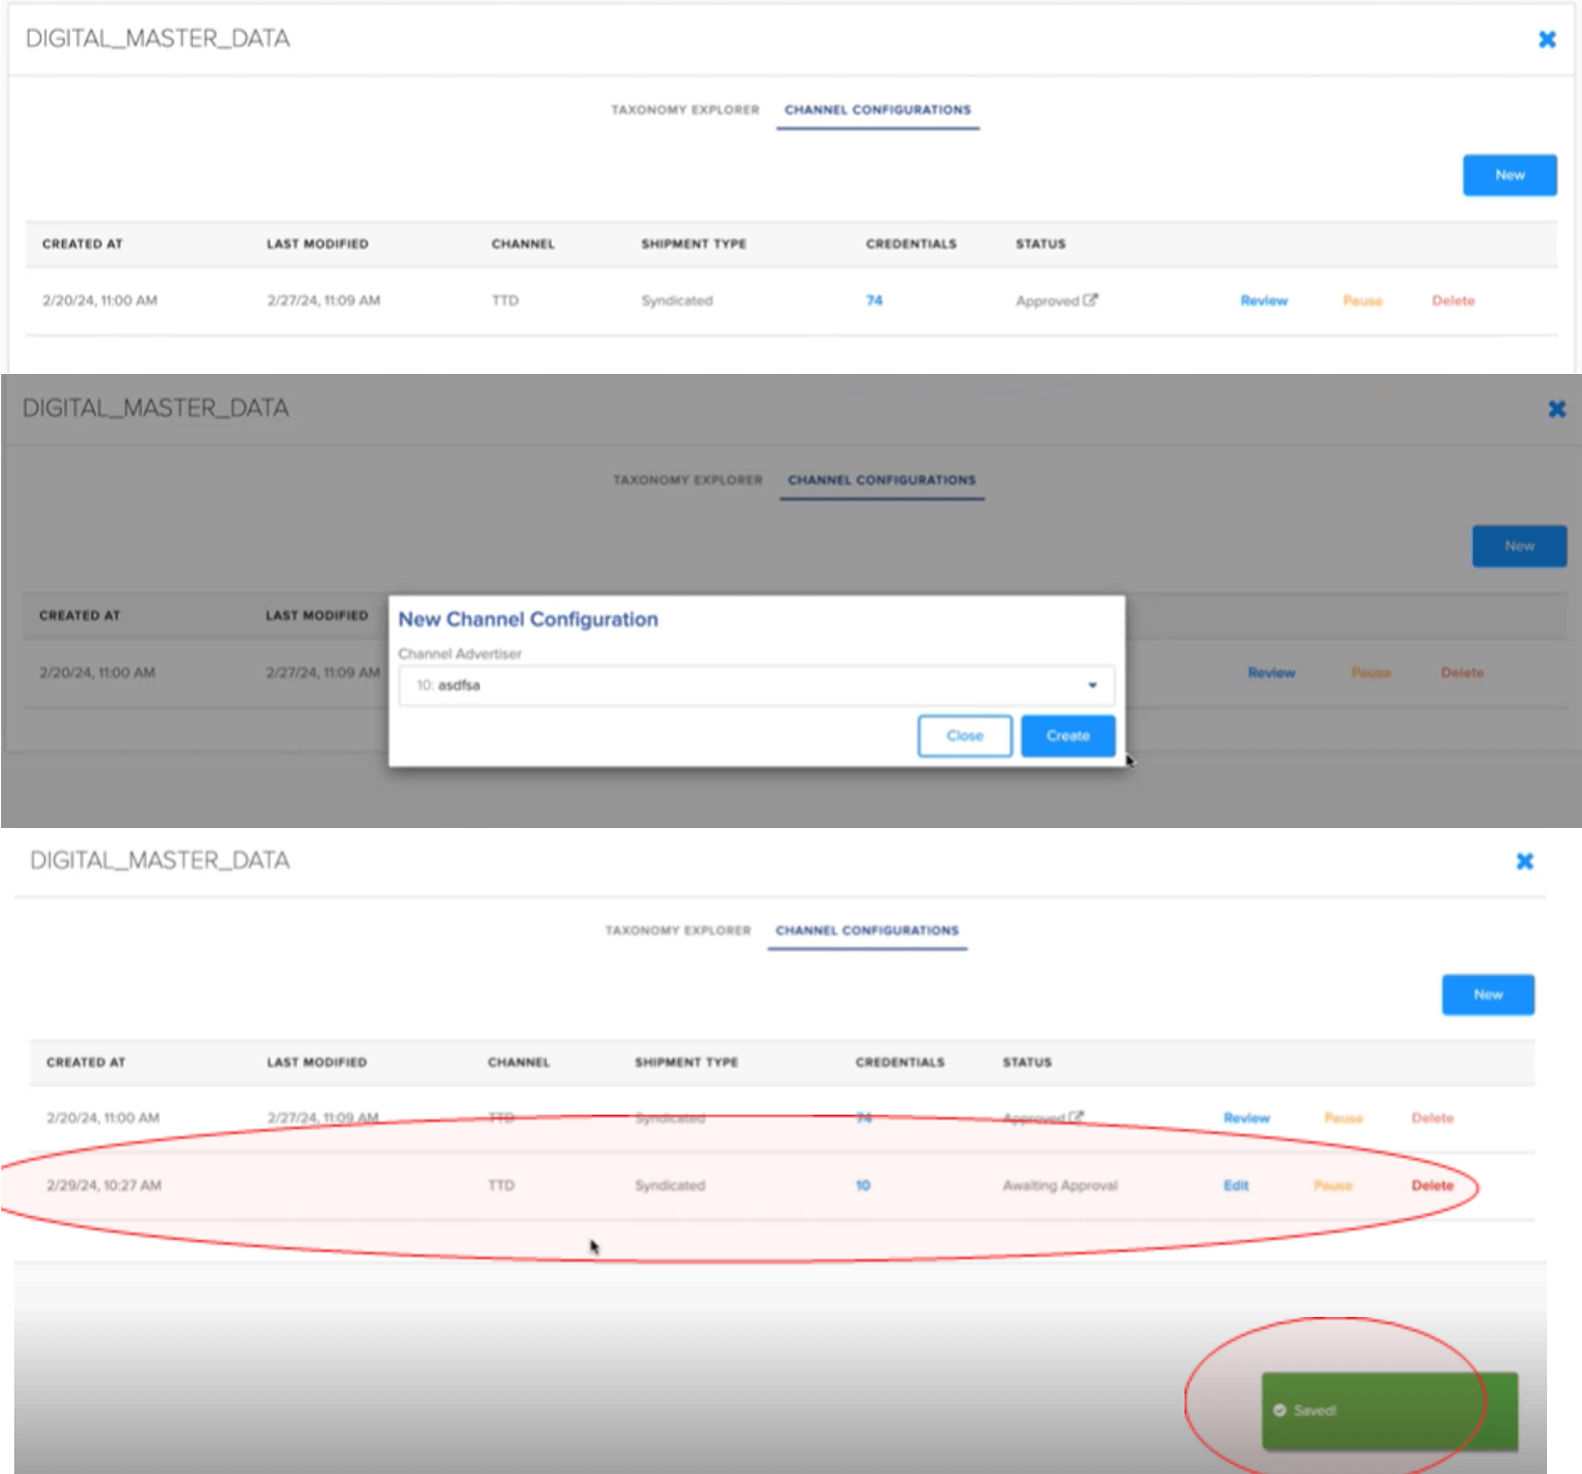
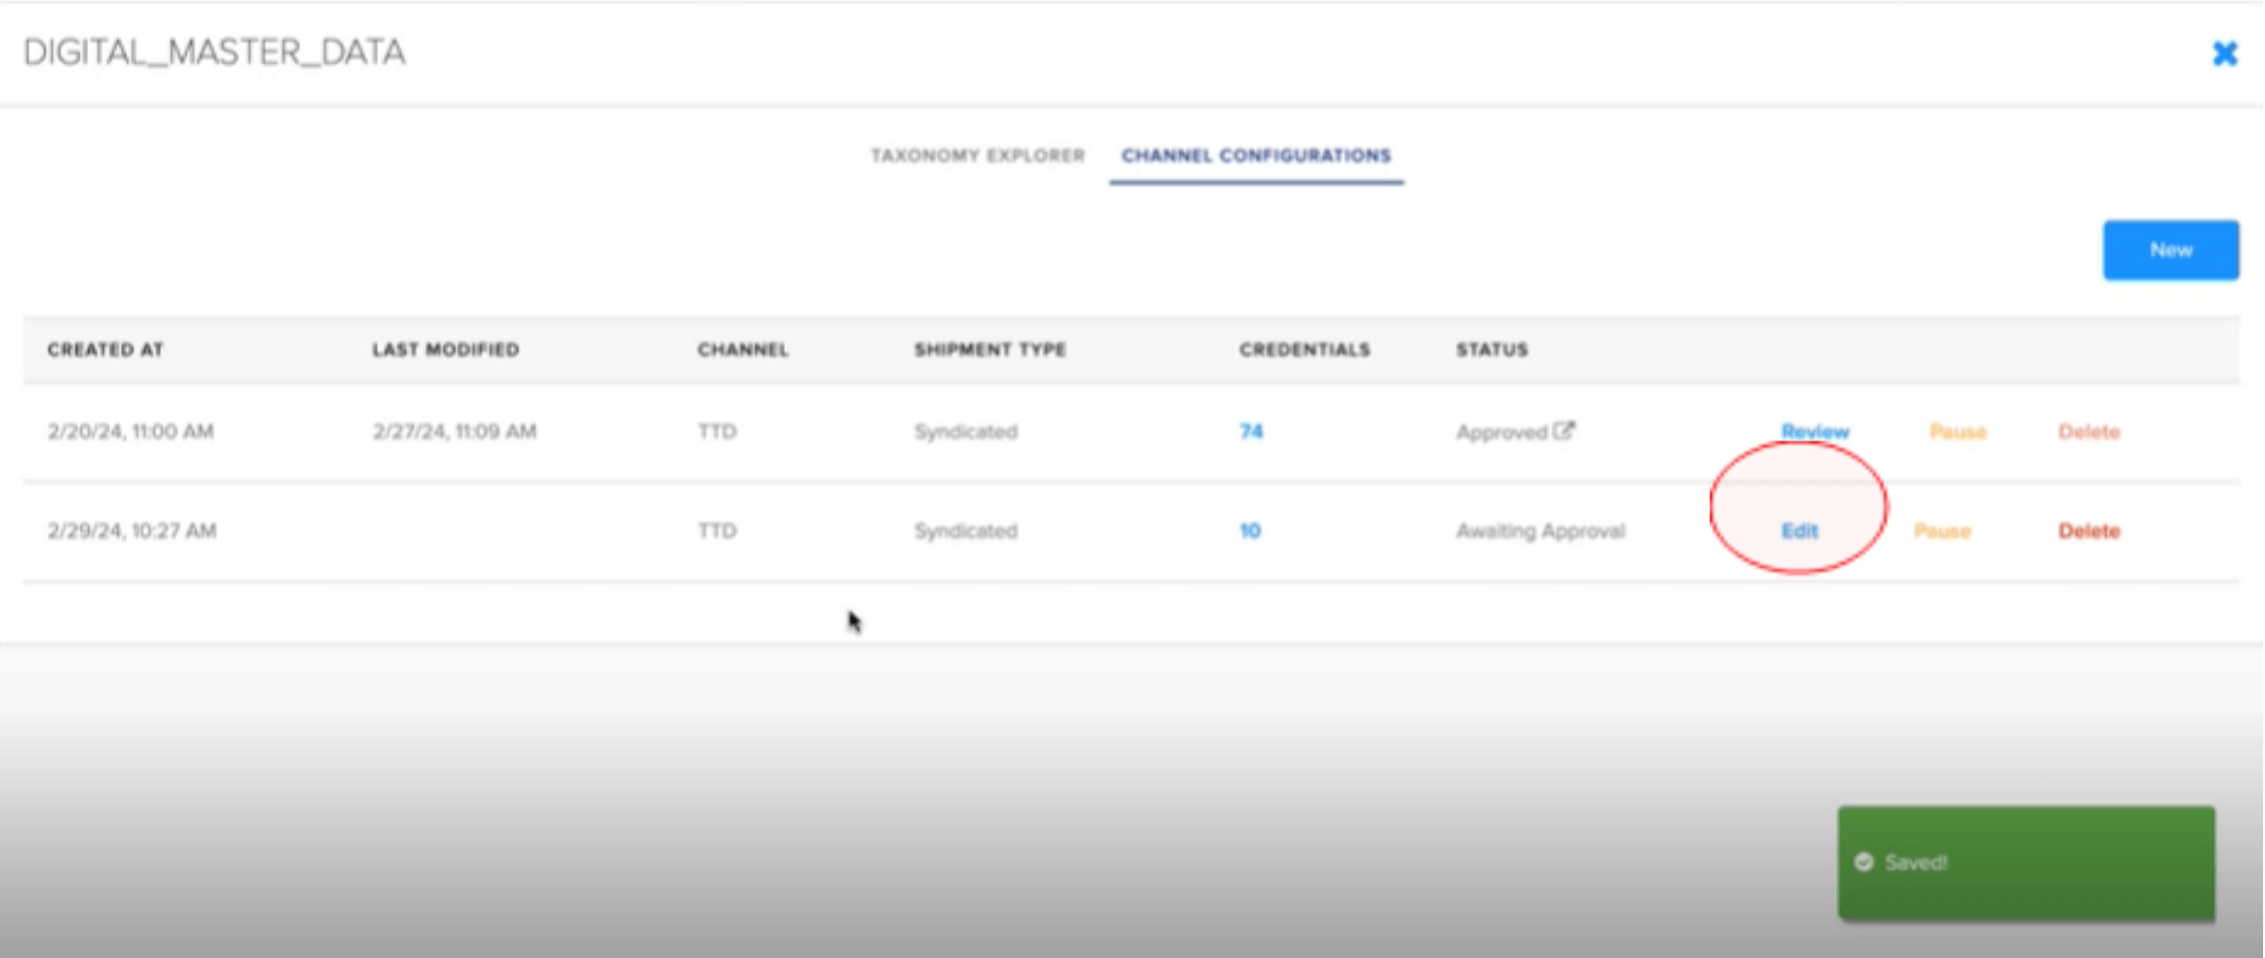
- Once the new taxonomy file has been created, you will see three actions on the right side of the screen: Edit, Pause, Delete.
- To proceed with updating the new taxonomy file for the selected destination, you will click on the Edit button.
- Once you click the edit button, there are 3 areas of the taxonomy that need to be edited before the configuration can be fully reviewed and activated. The areas are Tree Editing, Price Overrides, and Metadata Overrides.
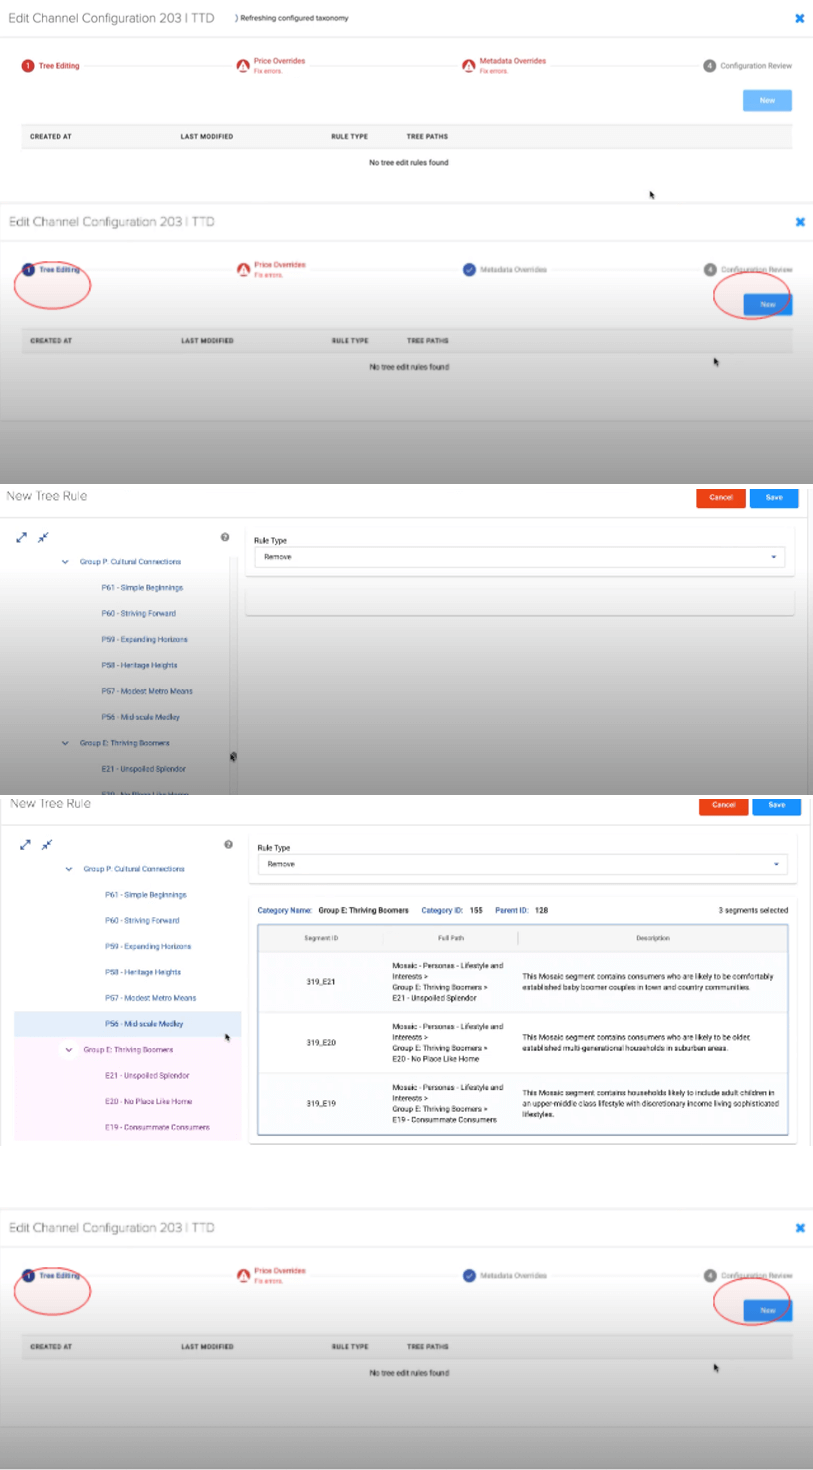
- The first area to be edited is in Tree Editing. In Tree Editing, you can configure your taxonomy as to remove segments before sending the configured taxonomy to the destination.
- If you remove segments from your taxonomy file due to destination restrictions regarding the number of segments you can send over or if you don’t want to send certain segments to some destinations, those segments will not be delivered to the endpoint destination.
- To create a new rule in Tree Editing, click the Tree Editing title in the navigation stepper at the top of the screen. Once in the Tree Editing section, click the new button.
- After clicking the new button, your taxonomy will be displayed for you to click on each segment you want to remove to ensure they are not sent to the destination
Note:
- The only rule supported in Tree Editing is the ‘Remove’ rule. You cannot add new segments once the taxonomy has been uploaded to Taxonomy Management. To add new segments to your file, you will need to add the new segments on your end and re-upload the updated audience and metadata files to your secure transport folder. This will restart the onboarding process where your identifiers will be converted to LUIDs, and you will have to validate the files in Audience Manager before being able to make edits in Taxonomy Management.
- Additionally, it is not mandatory to use Tree Editing – if there are no segments for you to remove, you can skip the Tree Editing section.
- Once you have verified all the segments you want removed from the taxonomy, click save at the top right side of the screen.
Note:
Removing segments in Tree Editing only impacts the taxonomy being sent to the selected destination. The removed segments will still be included in your base taxonomy.
If the rules need to be removed, you can select the delete button on the right side of the screen in the Tree Editing section.
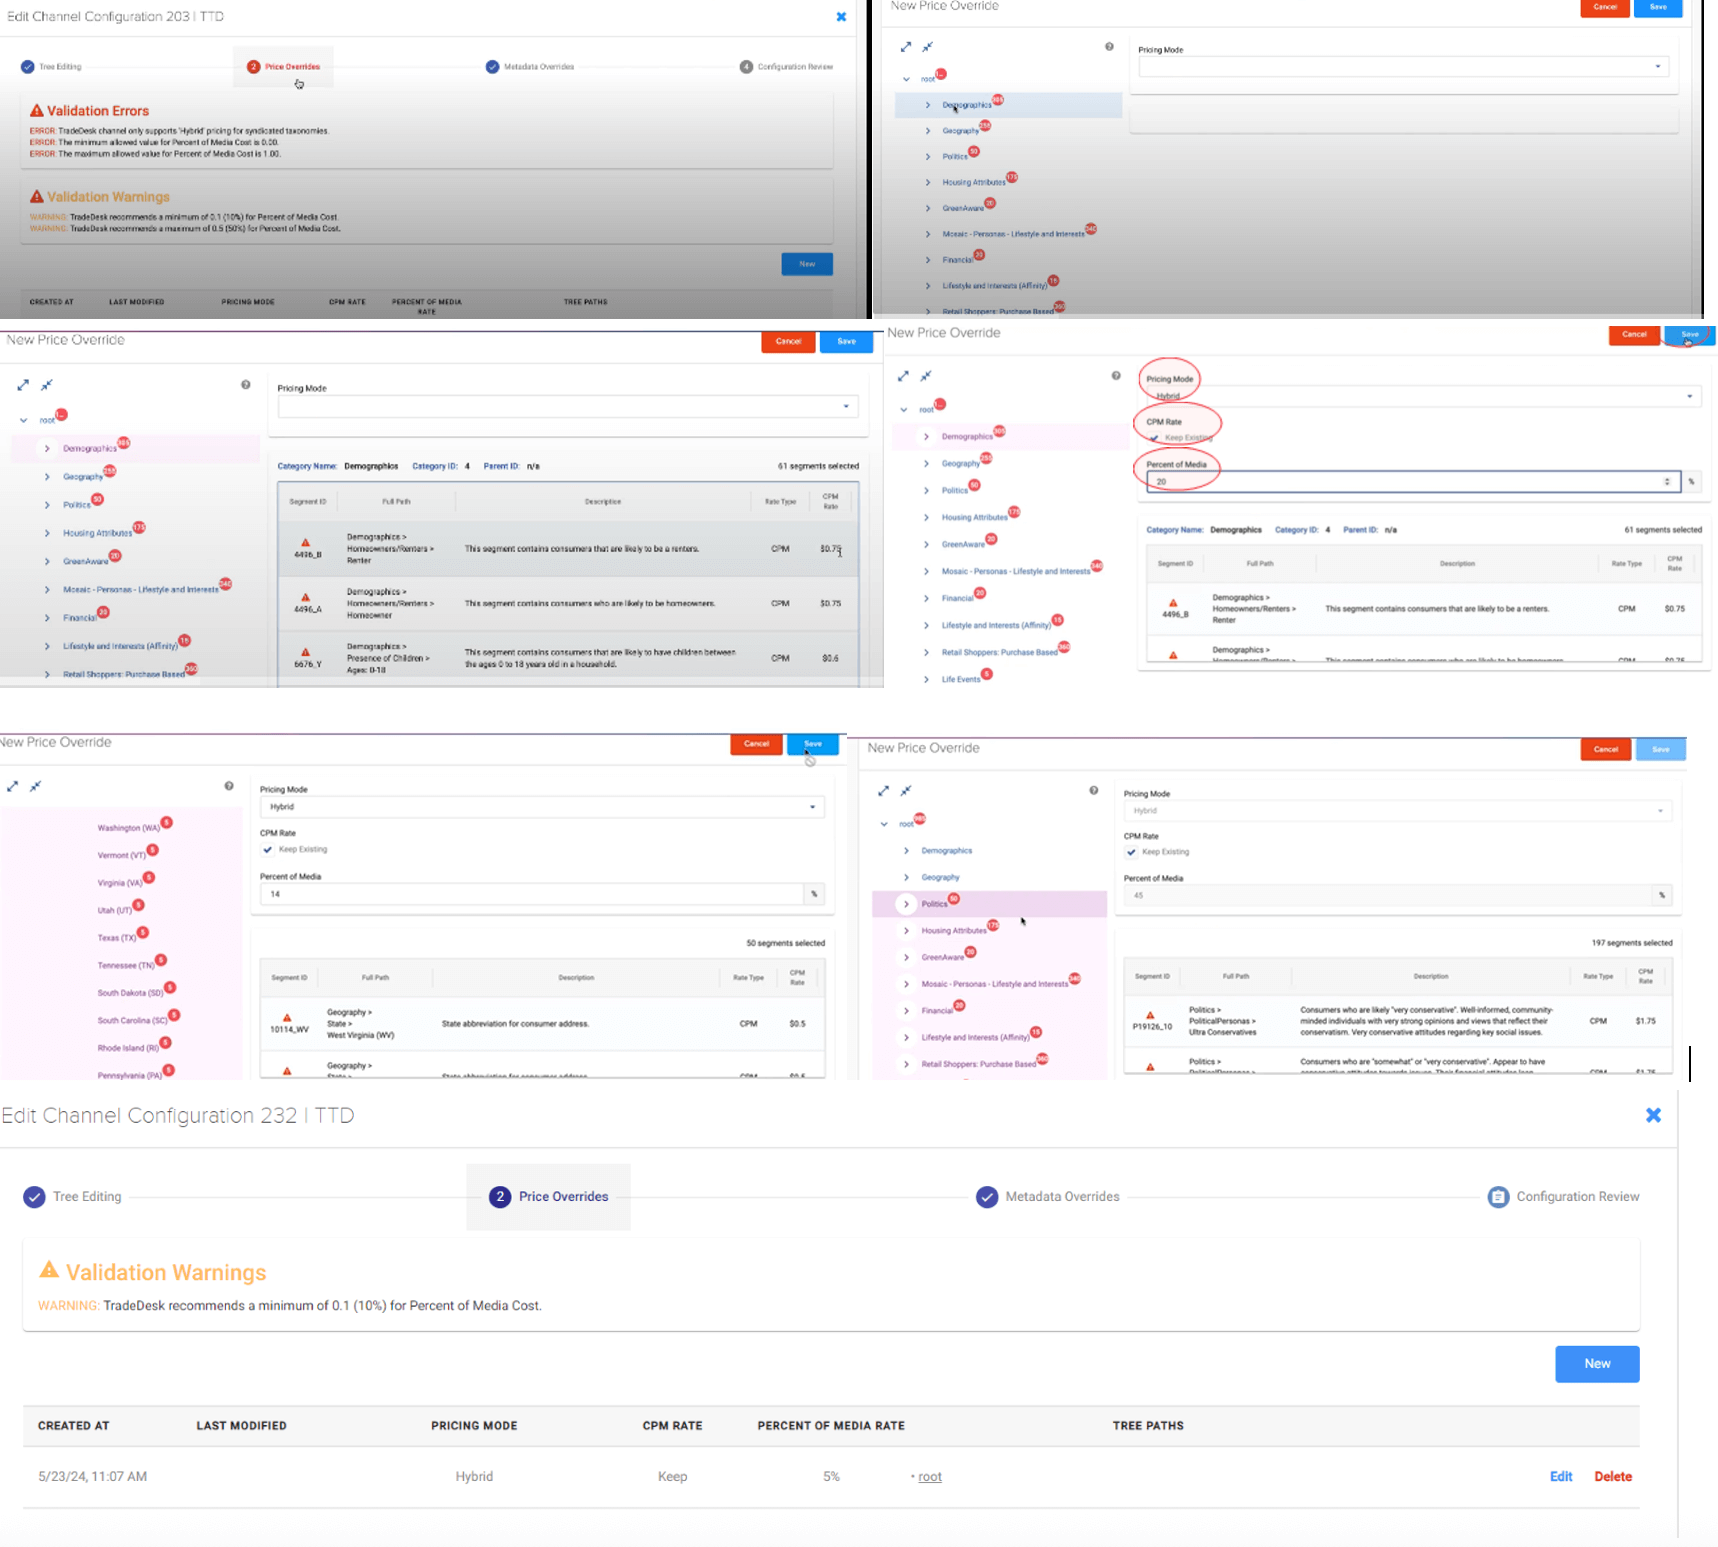
- The second area to be edited is in Price Overrides. In Price Overrides, you will update your taxonomy pricing to adhere to the rules specified for the selected destination.
- Each destination will have unique pricing validations and if the pricing on your taxonomy file violates these validations, errors will be flagged.
- To resolve the errors, click new at the bottom right side of the screen.
- Once you click new, you will see all the segments that have pricing errors that need to be resolved.
- To review the segments with the pricing errors, click on a segment.
Note: You can apply the same override to multiple or all impacted segments or categories by using the shortcut keys “Shift + Click” to multi-select segments. Price Overrides rules can also be created for just one segment if you have specific pricing for that segment.
- Pricing actions in Taxonomy Management will be determined by the selected destination.
- In the example below, the selected destination allows you to only assign hybrid pricing (combination of percent of media cost with a maximum cost per thousand impressions cap) and for the pricing mode, keep the CPM (cost per thousand impressions) rate, and assign the percent of media (a percent of media cost).
- Once the Price Override rule has been completed, click save at the top right side of the screen.
Note:
- Pricing validation warnings reflect the pricing recommendation of the selected destination. Experian works with the destination to capture pricing recommendations during our destination integration process. Once you have resolved the pricing validation errors, you can proceed to the next editing section, and you are not required to update pricing based on validation warnings.
- If the rules need to be removed, you can select the delete button on the right side of the screen in the Price Overrides section.
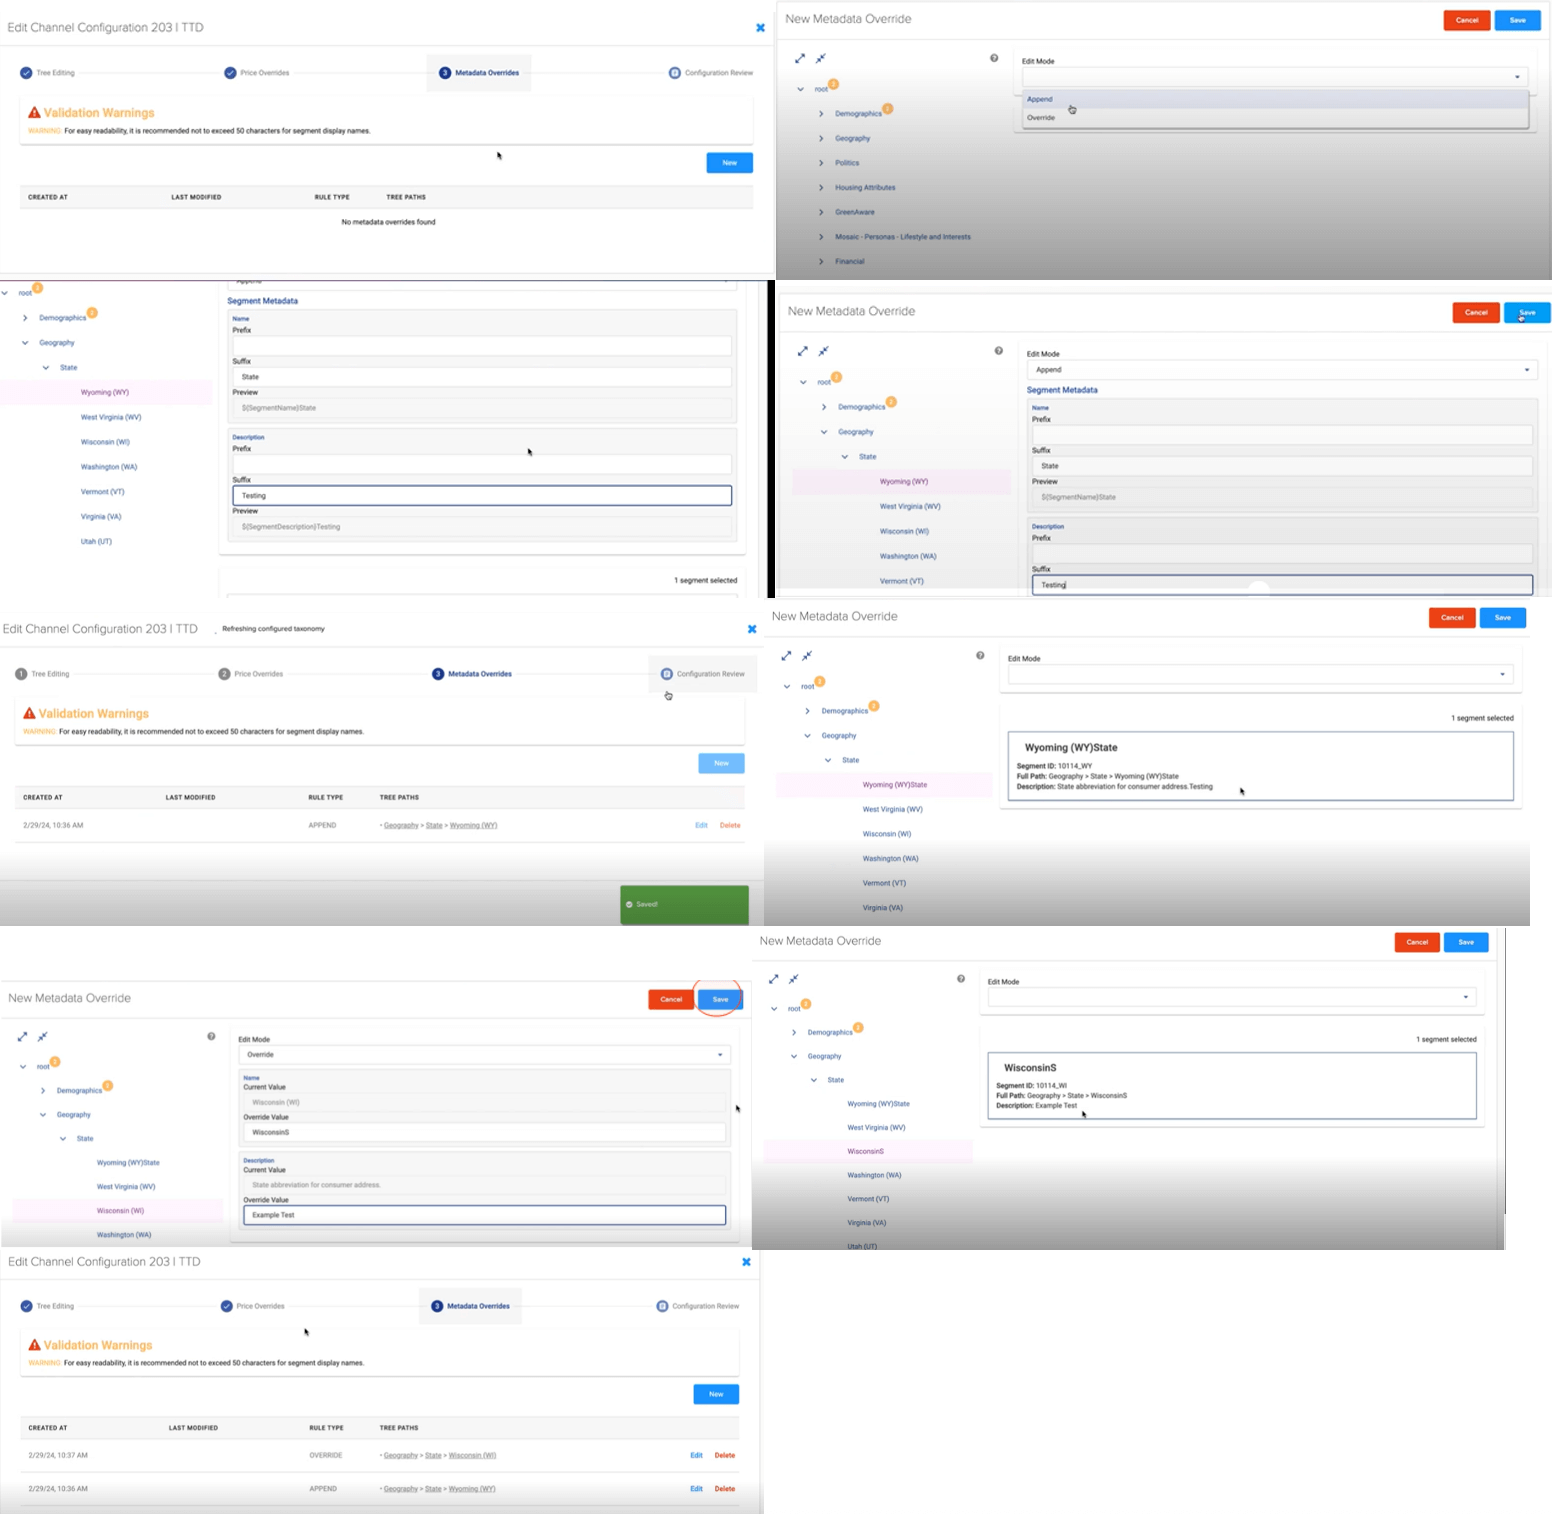
- The third area to be edited is in Metadata Overrides. In Metadata Overrides, you will update your taxonomy segment names or segment description to adhere to the rules specified for the selected destination.
- The specified rules for each destination will always appear in the Metadata Overrides section. Experian works with the destination to capture metadata recommendations during our destination integration process.
- If the selected destination has no errors, you can still make edits to your taxonomy metadata as desired. To resolve the metadata errors or create a new Metadata Override, click new at the bottom right side of the screen.
There are 2 edit modes in Metadata Override:
- Append: Add information to a segment
- Override: Override existing values to reflect new/additional values for a segment
- Once the editing has been completed in the Append mode, click on the save button at the top right side of the screen. The edit will be saved, and the updated segment will be shown in the taxonomy tree.
- To review the updated segment, you can review once all edits have been completed and the taxonomy is in Configuration Review, or you can follow the steps to create a new Metadata Override and look for the updated segment.
- Once the editing has been completed in the Override mode, click on the save button at the top right side of the screen. The edit will be saved, and the updated segment will be shown in the taxonomy tree.
- To review the updated segment, you can review once all edits have been completed and the taxonomy is in Configuration Review, or you can follow the steps to create a new Metadata Override and look for the updated segment.
- If the rules need to be removed, you can select the delete button on the right side of the screen in the Metadata Overrides section.
Note: Experian has its own internal review process to identify and flag segments that contain or infer consumer sensitive information and/or segments that contain vulgar words. Users are expected to follow Experian’s restrictions as specified in the Experian Audience Restrictions. For a copy of these restrictions, please reach out to your Experian account team member.
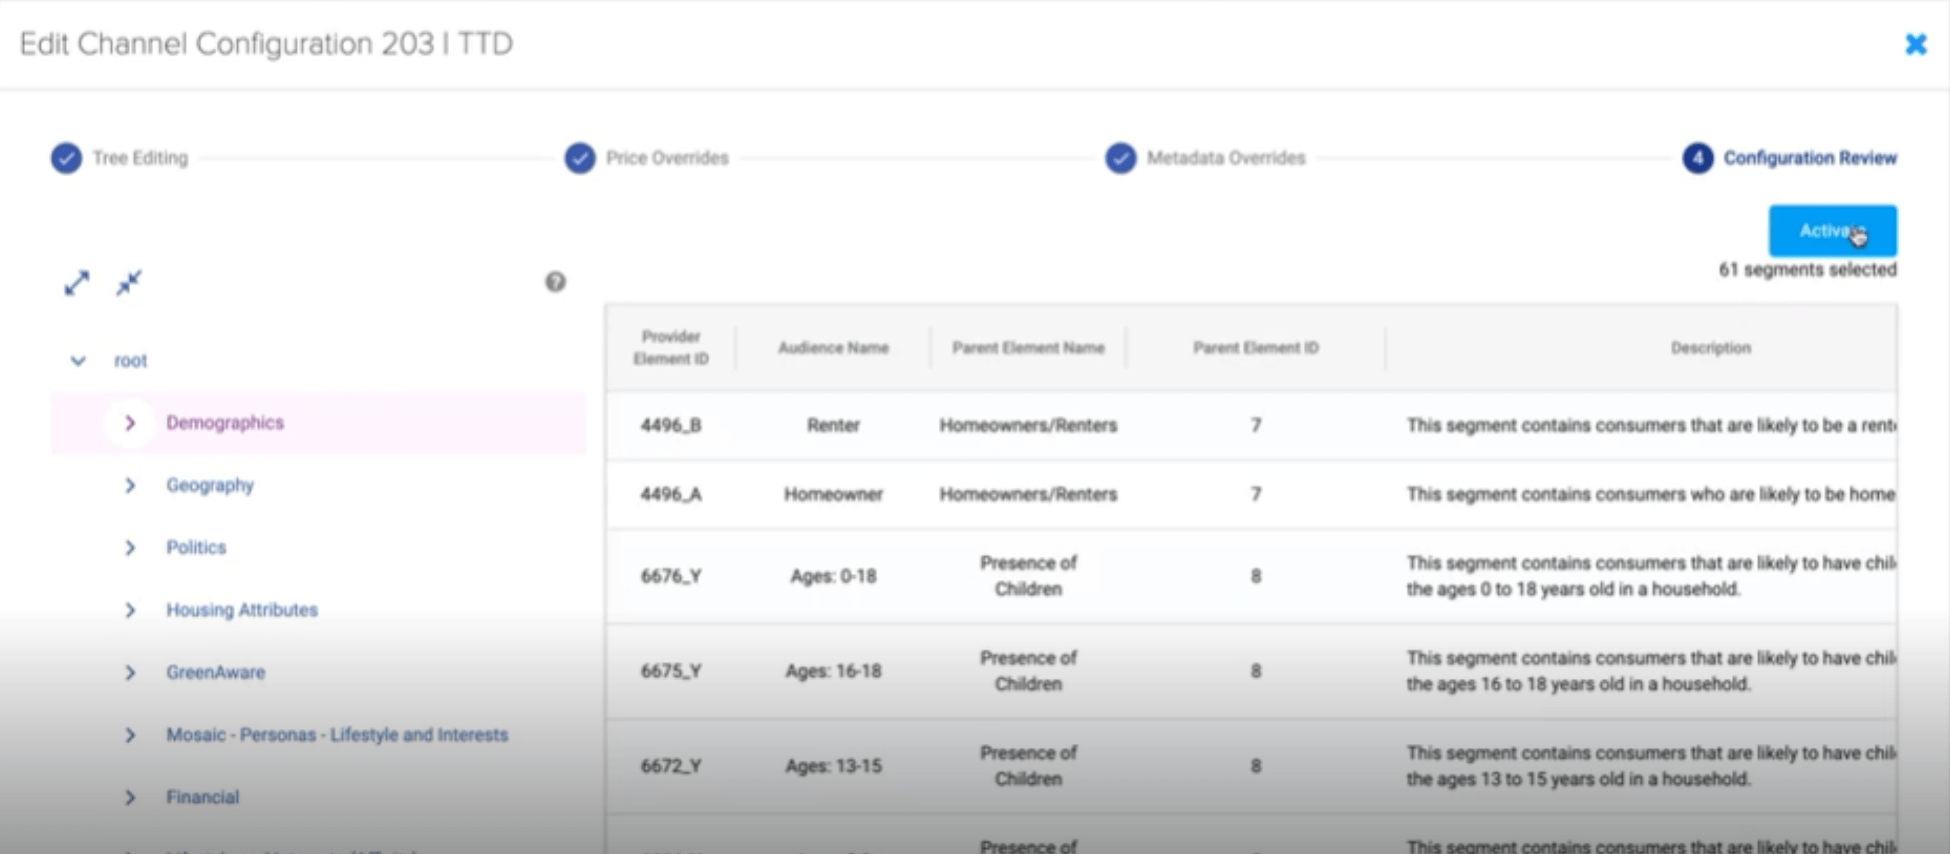
- Once all the edits in the first 3 sections (Tree Editing, Price Overrides, Metadata Overrides) of the Channel Configuration have been completed, you will proceed to the Configuration Review section.
- In Configuration Review, you will review the taxonomy configuration you have created to ensure no further edits are needed and you are ready to activate your taxonomy configuration.
- Once you have confirmed all edits and you are ready to send the configured taxonomy to the selected destination, click on the Activate button on the top right side of the screen.
Note: Once the configured taxonomy has been activated, Experian will work with the selected destination as needed to ensure the taxonomy is reviewed, approved, and uploaded by the destination. Should there be an error that results in further editing, Experian will communicate those errors to you so you can make the requested edits.
Adding Taxonomy Management Users
- To add additional users to your account, you will select the add user icon on the user tab of your account page.
- Once the new user’s email address has been entered, you will select next and fill in the additional user information.
- Once the user information has been entered and confirmed to be accurate, an email will be sent to the new user’s email address.
- To create a login, the new user will use the same email address you used during their setup process and create a password.
- Once the new user has entered their email and the desired password, the user will sign in and will now have access to the platform.
Third-Party Onboarding FAQ
- We currently use a file-based ingestion method. We can share the specifications listed in the implementation guide and review with you if needed. We are always open to feedback on our onboarding specifications.
- Experian has a robust network of direct demand, supply, and TV platform integrations, we also can onboard audiences to our own data marketplace within Audience Engine, and through Audigent private marketplaces (PMPs) we can send audiences to most supply and demand platforms.
- Some of our destinations include The Trade Desk, Magnite, Audigent, Madhive, NBCU, and A4. We can share a complete list of media destinations upon request.
- Yes, we have a reporting dashboard and aim to have usage reporting the month after use, however, some destination partners, such as TV, only report usage quarterly.
- We require a data monetization program agreement (DMPA) and an onboarding contract schedule. We recommend a light PMP schedule is also signed so that audiences can be used in Audigent PMPs.